Use the Members Search panel to search for members matching your search criteria. You can then select the required elements and add them to your query. You can also build a custom List based on your elements selection, which can then be saved and shared through the Content Manager.
The Members Search functionality provides a convenient way for users to find the member elements they need and add them to the query.
Accessing the Members Search
The Members Search panel can be opened from the Report ribbon:

The Members Search panel can also be opened from the Search dropdown list in the Elements panel:
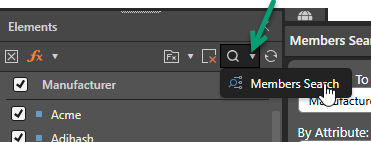
Note: Where the Members Search panel is opened from the Elements panel, the Hierarchy To Search field is automatically populated with the hierarchy from the Elements panel.
Members Search panel
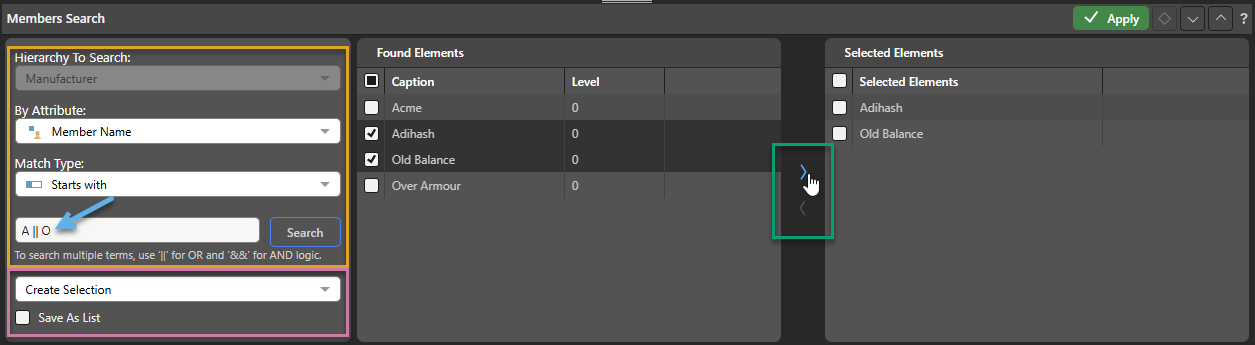
The Members Search panel is where you search for members and where you copy the various "Found Elements" from each of your searches into a single Selected Elements list:
Search Criteria
Define the Search Criteria for your members search (orange highlight above):
- Hierarchy to Search: The hierarchy that you are searching for members.
- By Attribute: The attribute that your search should operate against. By default, your search will be across the Member Names, but you can use a different attribute for your search by selecting it here. For example, if your Product hierarchy contains a Color attribute, you could select Color to search for "Black" products or products whose Color begins with a "B" (black, blue, brown, and so on).
- Match Type:
- Contains: Return results that contain the search term or terms.
- Starts With: Return results that start with the search terms.
- Ends With: Return results that end with the search terms.
- Exact: Return results that exactly match the search terms.
- Search Terms: The text term or terms to search. This is the name or part of the name of the item and can be a single search term, a comma-separated list of search terms, or a set of search terms combined by the logical operators
||(OR) or&&(AND). See below for more information.
Search Terms
The Search Terms field (blue arrow above) is a simple text field where you supply your search term or terms as standard text:
- If you enter a term into the field without any "special characters" (commas or logical operators) it is assumed to be a single search term.
- If you separate terms using commas, each of the terms is searched for independently and the result from each match is returned in the results (Found Elements).
Logical Operators
You can also specify the relationship between your search terms using logical operators:
- Use
&&(the AND operator) to indicate that the terms either side of the operator must both be true for a match to be made. For example, where the Search Type is Contains,AC && OOonly returns results that contain both AC and OO. - Use
||(the OR operator) to indicate that either of the terms can be true for a match to be made. For example, where the Search Type is Contains,AC || OOreturns any results that contain AC and also any results that contain OO.
You are not limited to two items when using the logical operators. For example, you could use AC || OO || PR to return results where the item Contains AC, OO, or PR. If you use both logical operators in one search term, you should also add brackets to define the sequence of execution. For example, AC || (OO && PR) returns results containing AC and results containing both OO and PR.
Tip: Since you can perform multiple searches and add the results from each to your Selected Elements list, you should keep your search terms simple.
Note: Using OR operators or a comma-separated list of terms produces the same result.
The following search term examples are assumed to have the Search Type: Contains and the default Attribute selection (Member Name).
This search term returns all items whose name contains one of bikes, chairs, or tables:
bikes, chairs, tables
This search term is effectively the same:
bikes || chairs || tables
This search term returns all items whose name contains both "bikes" and "road":
bikes && road
Selecting Elements
When you click Search, the list of elements that match your search criteria are returned and shown in the Found Elements panel. You can select those elements and then, using the right-facing arrow (green highlight above), copy them into the Selected Elements panel.
Important: You can perform multiple searches and add results from different searches to the same list of selected elements.
To remove a member from the Selected Elements panel, select it and click the left-facing arrow
Selection
Before clicking Apply, choose a selection option (purple highlight above):
- Create Selection: This option adds the Selected Elements to a new query. If the query already contains an element selection from the members search, from the same hierarchy as the new selection, the previous selection will be replaced with the new one.
- Add to Selection: This option adds the selected elements to the current query.
- None: This option does not add the selected elements to a query.
Note: This dropdown list is only enabled when at least one result has been added to the Selected Elements panel.
Tip: None is useful if you want to save the selected elements as a List, without adding them to the query.
Save as List
Select this checkbox if, in addition to the given selection type, you also want to save the selected elements as a List. If you've saved your selected elements as a list, your list will appear underneath the Elements panel in Discover:
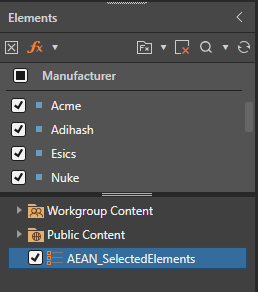
Tip: You can right-click the new List to open it in Formulate, save and share it in the CMS, or delete it.
Walkthrough Example
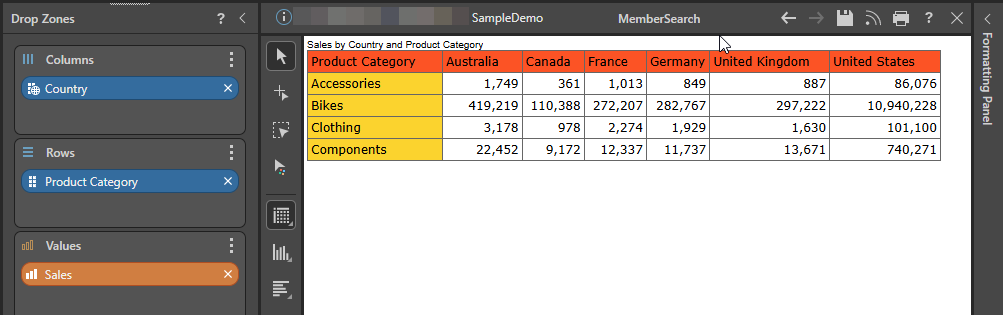
This example is based on the following simple grid:
Step 1: Set up Search Criteria
From the Members Search panel at the bottom of the page:
- Use the first two dropdown lists to select the appropriate hierarchies from the Products dimension:
- From Hierarchy to Search select Product.
- From By Attribute change the selection from the default Member Name to Class.
- Set up the search criteria:
- From Search Type dropdown list, select Contains.
- In the Search Term field, type "M."
- Lastly, click Search.
The search runs, and the results are loaded into the Found Elements panel:
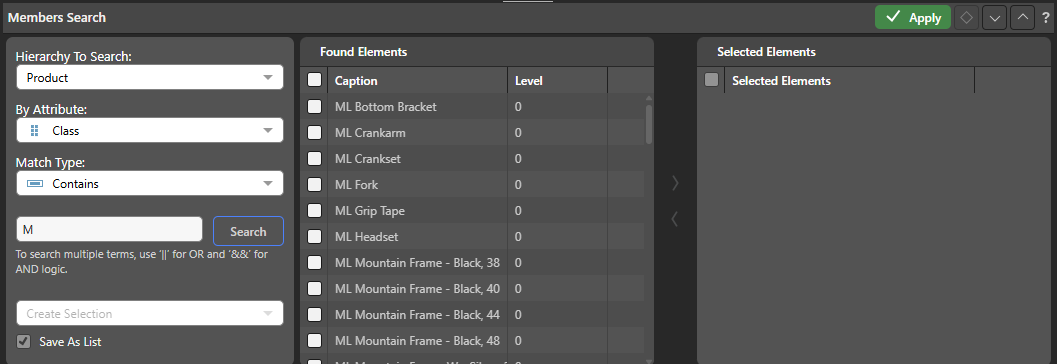
Note: The Class for each of the Products in the Found Elements list contains the Search Term "M."
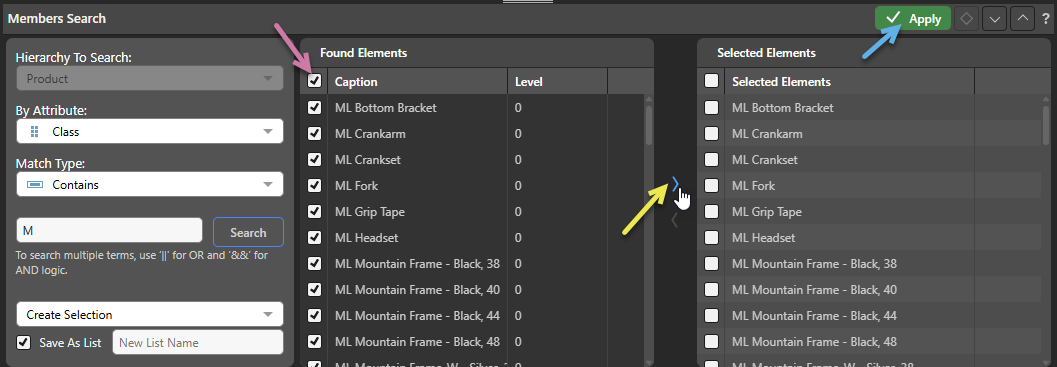
Step 2: Select the Elements for your List
- Select All (purple arrow below) in the list of Found Elements.
- Using the right-facing arrow (yellow arrow), move the selected elements into the Selected Elements panel.
You will now see all results under the list of Selected Elements:
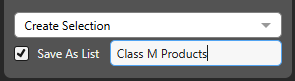
Step 3: Save your Selection as a List
- From the Selection Type dropdown list, choose Create Selection. Then, select the Save As List checkbox and supply the name "Class M Products":
- Click Apply (blue arrow).
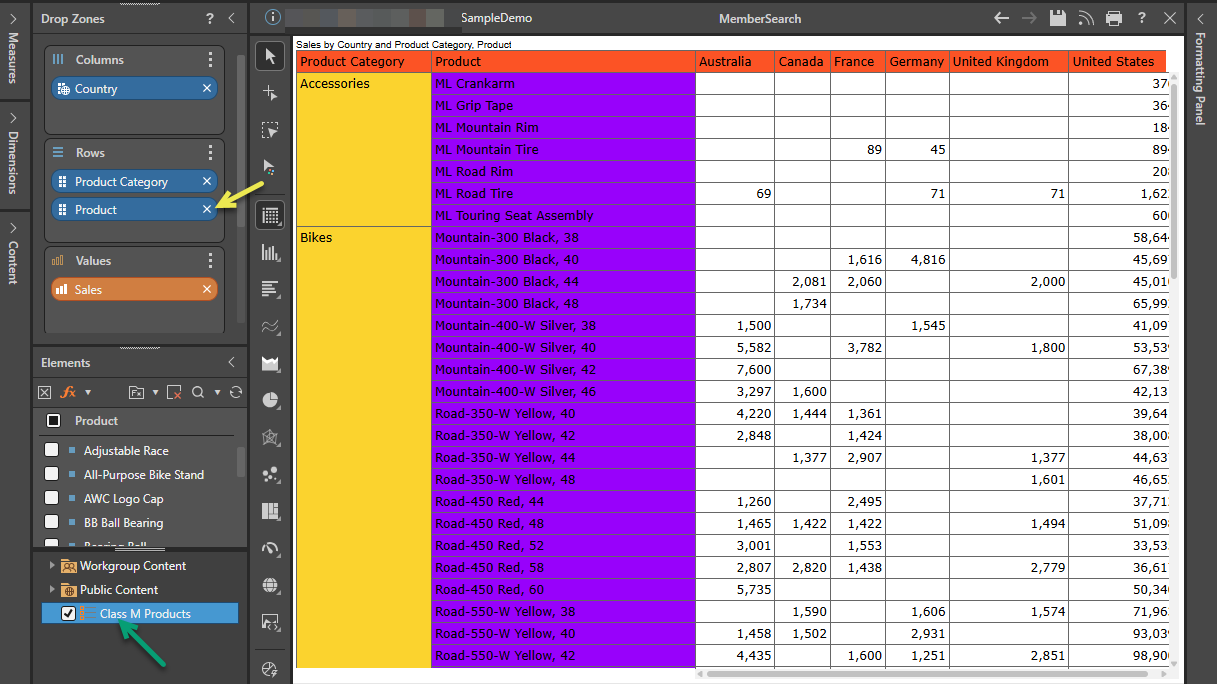
The selected elements are added to the new query and your discovery is updated as follows:
- The hierarchy associated with your Selected Elements is added to a new query (yellow arrow below) and a Product column is added to your grid accordingly.
- Your new List is added to your Elements panel (green arrow) and selected.
Note: If the query had already contained a list of elements derived from the members search for the same hierarchy (in this case, from the Product hierarchy), the previous selection would have been replaced by the new one. This is controlled by the Create Selection option.
Tip: You can right-click the List in the Elements panel (green arrow above) to open its context menu. The context menu allows you to share it, use it to create other dynamic logic, or open the list in Formulate for editing.
Related information
Lists
If you save your selected elements as a List, you can manage that list in Formulate as you would any other.
- Click here for more information